By: Michael Eid
I had the opportunity to help my best friend, Bashar AbuJardeh, on a huge case as a dental student. Although crowning anterior teeth may be routine for a seasoned dentist, it’s a rare and special opportunity in dental school — especially when the case spans from tooth #6 to #11.
Working on this case taught me a lot, not only about the technical side of crown preparations but also the importance of comprehensive treatment planning.
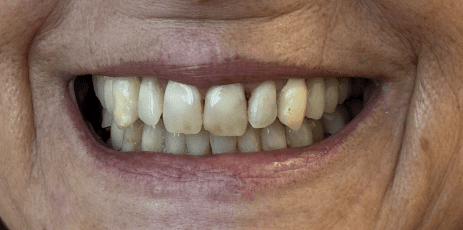
This case started with an extensive conversation with the patient about her goals and treatment options. She had recurrent caries on several anterior teeth, old composite restorations, and was unhappy with the esthetics.
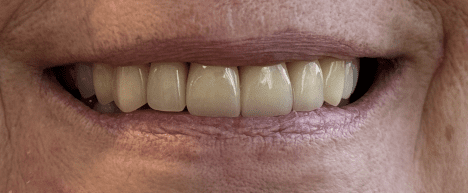
We discussed various possibilities, from composite veneers to porcelain veneers, but she ultimately chose full-coverage Emax crowns for 6–11. This choice addressed both the functional need to remove caries and the esthetic desire for a uniform, brighter smile.
1. Plan the Prep Outline Before You Touch the Tooth
Before even picking up a handpiece, I learned to stop and visualize the final prep outline on each tooth.
This isn’t just about symmetry — it’s about strategy.
In this case, a slightly malpositioned #7 was corrected by adding more axial reduction on the mesial.
That decision had a ripple effect: it altered the mesial contour of #8, which then influenced the facial axial plane of the rest of the arch. Without this mental “map” of the sequence, you risk chasing contours mid-prep and losing harmony across 6–11.
2. Do Core Build-Ups Before the Prep
Completing core build-ups before you start prepping ensures all caries are removed and gives the patient a “preview” of the shape and size their new crowns will be.
It ensures that you can determine restorbaility and if the teeth need RCT and/or functional crown lengthening.
This is an easy step that saves major headaches down the line for both yourself and your patient.
3. Margin Consistency is Everything
Emax rewards precision and punishes inconsistency.
Even a 0.2 mm discrepancy in your margin can affect fit, emergence profile, and esthetics. Keeping a steady, continuous chamfer or shoulder line ensured all crowns seated perfectly and blended with the gingiva.
4. Prep With the Final Thickness in Mind
Emax’s optimal thickness (1.0–1.5 mm incisal, 1.0–1.2 mm facial) needs to be built into your first pass. Under-reduction means you’ll either compromise translucency or have to re-prep. Depth-cutting burs were my safeguard against “eyeballing” it wrong.
5. Digital Scanning and Communication Matter
Once the preps were complete, we digitally scanned the teeth instead of taking traditional impressions.
We used retraction cord and Viscostat to control gingival bleeding and achieve proper hemostasis, which made the margins crystal clear on the scan.
This allowed us to immediately check the margins, occlusion, and alignment in 3D. The digital workflow let us visualize the final outcome, adjust contours on-screen, and reduce the need for multiple remakes.
Final Thought
Even though this was not my case, and I was assisting my best friend, I was still able to learn as if it were my case.
You don’t always have to be the one performing the treatment to gain valuable experience — observing a procedure, asking questions, and reflecting on each step can teach just as much as doing it yourself.
In fact, assisting often gives you a broader perspective because you can focus on the “why” behind every move, rather than being fully absorbed in the “how.”
*Pt consented to photography of before and after results
