By: Michael Eid
Class II preparation and restoration are where things get real. You’re now dealing with proximal surfaces, tight contacts, and matrix systems. This guide simplifies it all for you.
What Is a Class II Cavity?
Location: Proximal surfaces (mesial/distal) of posterior teeth

Class II Preparation Steps
Occlusal Portion
- Same as Class I: Follow grooves and include dovetails if needed
Proximal Box
- Break contact: ~0.5 mm buccolingually, you need both gingival and proximal clearance to be able to fit a matrix band in there. If there’s not enough clearance, you won’t be able to properly fit a band/matrix. But if you make it too large, the contours of your restoration will look off which will leave a food trap which is dooming your restoration to fail
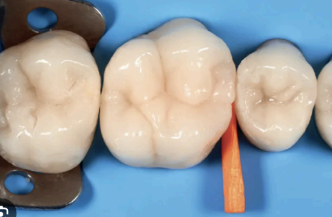
Matrix & Wedge Tips
Sectional matrix + ring → Best for composite, I personally love the garrison matrix system. I never miss making a tight contact with my restorations since using their system.
Wedge goals: Using a wooden wedge allows swelling after water is introduced, this allows a tight contact and proper contour of the restoration. I like to take a football burr and shave the wedge to properly fit the embrasure so I can ensure a nice and tight seal. You should visually inspect with your probe before you restore that the matrix is sealed on the gingival floor. Composite restorations shrink and fail at the margin line.
Quick Tips
- SIM Lab:
- Use a wedge guard to avoid nicking the adjacent teeth.
- Take a pencil and mark on the adjacent teeth where the contact is. That way when you are drilling, the water won’t wipe off the contact and you know exactly how far to extend your prep bucco-lingually.
- Use a 1mm hatchet to create 900 angles in the box to avoid nicking adjacent teeth. This will also help you see if your axial depth is too narrow or large.
- Clinic:
- Real teeth are very different from SIM Lab preps, you must always follow the caries. After you create an initial box, use a slow speed #2 or #4 round burr at 5,000 rpm to remove the caries without removing sound dentin.
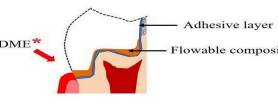
- Deep marginal elevation → a concept I felt that was never talked about but you must become proficient at as most class 2’s need DME.
- DME is when the gingival floor is below the level of the gingiva. This becomes tricky as you cannot fit a matrix band properly. Isolation is a hard variable as homeostasis can be difficult to achieve.
- If hemostasis is controlled: line the gingival floor with flowable composite to slowly build back the gingival floor to be equa or supragingival. Then you can attach the matrix to finish the restoration.
- There are also DME kits which you can purchase that have subG matrix bands and wedges.
- If hemostasis cannot be controlled: Use an RMGI (which does not require as much isolation compared to composite) to build the floor and repeat the same steps as above (open sandwich technique)
- It is important to know that DME is a difficult procedure and there are many techniques involved with this. I encourage you to follow up with CE courses to become more efficient.
- When executed correctly DME can last as long as a normal class 2. However if done incorrectly the prognosis of the tooth can be poor.
- Refining/Polishing:
- There are many tips to refine your restoration but what I’ve found best is placing a large wedge to separate the teeth. And through a combination of SOFLEX discs and instruments like a 12 blade or hollenback to remove any overhang/flash. Using a SOFLEX disc and ensuring the disc is hitting both composite and tooth structure will remove any overhang without causing damage.
- I then go in with my polishing wheels and polish until it is difficult to tell what is tooth and composite. The importance of polishing is not just for aesthetics but a rough surface will allow bacteria to stick on more easily and ruin your restoration.
Final Thought
Class II preps in my opinion are one of the hardest preps you will do. There is no easy guide that will make you “master” class 2’s. But understanding the theory of what you’re doing it and WHY you’re doing and continuing to practice will help you become more proficient.
Keep Reading: Class I Preparation and Restoration: High-Yield Guide for D1 Students
Photo by Esma Karagoz