By: Michael Eid
As a D1 student, learning the fundamentals of cavity preparations in sim lab is your first step toward clinical success.
This guide will help you bridge the gap between lab exercises and real patient care by teaching you how to think clinically from day one.
You’ll gain insights on handpiece control, bur selection, and preparation techniques that will directly translate to the clinic.

What Is a Class I Cavity?
- Location: Occlusal surfaces of premolars and molars, and lingual pits of maxillary incisors.
Class I Preparation Steps
Outline Form:
- Follows natural grooves and fissures, include “dovetails” to allow proper retention.
- Composite: Slightly divergent walls to avoid unsupported enamel, relies on chemical retention.
- Amalgam: Convergent walls for mechanical retention.
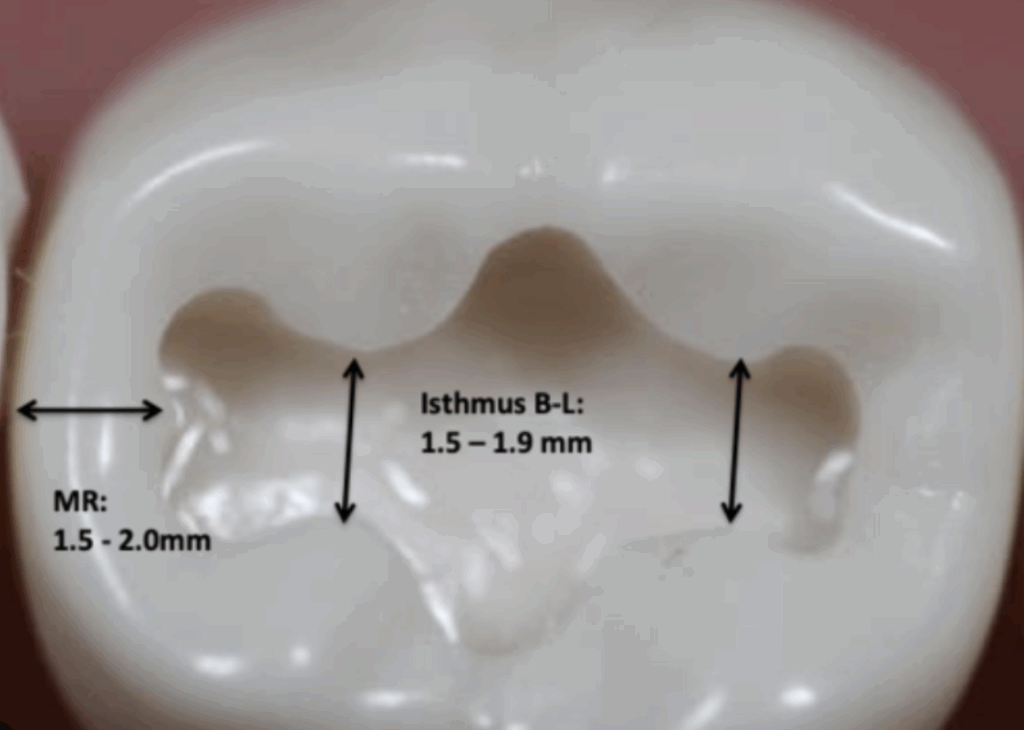
Depth:
- 1.5–2 mm deep to reach sound dentin and allow proper retention of composite.
- In clinical practice, depth may increase if decay extends deeper.
Cavosurface Margin:
- 90° angle for strength.
- Smooth, rounded internal line angles to prevent fractures—sharp corners are a no-go!
Burs I Recommend
Best Burs for Class I Preps:
- 808/508 bur (Diamond): Ideal for most of the prep. The diamond provides smooth cutting, leaving preps clean and polished before refinement. The length of the burr is ~1.8mm. When the top of the working end of the burr reaches the cavosurface margin, you know that you’re around the depth of the prep.
- Round bur (#2): Used at 5,000 rpm on slow speed to carefully remove remaining caries while providing tactile and visual feedback. Typically caries looks like the debris off of an eraser. It comes off very easily with a slow speed and you can feel the difference between it and dentin.
- 808F (Fine diamond): Perfect for final smoothing with minimal enamel reduction. Only using tactile pressure pulpally, use a fine striped diamond and refine axially to ensure smooth corners. I like to run this step on 20k RPM (electric handpiece) and it is crucial to ensure to refine and not deepen your prep.
Restoration Options
Amalgam: (Less common today)
- Prep: Requires more mechanical retention (deeper, wider preps).
- Margins: Convergent.
Composite:
- Prep: More conservative, relies on bonding.
- Margins: Parallel or slightly divergent.
Key Tips for Success
- Slow and steady: Don’t rush. Controlled, light strokes prevent overcutting.
- Check for decay: Use the slow-speed round bur to feel for remaining caries.
- Smooth and refine: Finish with a fine diamond bur for a polished prep.
Sim Lab vs. Clinic Tips
Sim Lab:
- Consistency is key: Teeth are standardized, so focus on technique and precision.
- Experiment with bur angulation: Use the opportunity to practice handpiece control and refine your stroke patterns.
- Training your mind: The hardest part in my opinion is training your mind to deal with millimeters. We are so used to inches and feet, where we dont realize that 0.5mm can mean the world of difference in dentistry
- No patient stress: Take your time and get comfortable with each step.
Clinic:
- Adapt to variations: Real teeth have unique anatomy, making preps less uniform. Be flexible.
- Soft tissue management: Use rubber dams or retractors for better visibility.
- Efficiency matters: Work precisely but efficiently—patients have limited tolerance for long procedures.
Final Thought
Efficient Class I preparations and restorations are essential skills for D1 students. Improving this simple procedure will strengthen your clinical foundation for more complex procedures.
Keep Reading: Tooth Extractions – Simple vs. Surgical Procedures for Dental Students
Photo by Photo By: Kaboompics.com